常用配置
常用配置
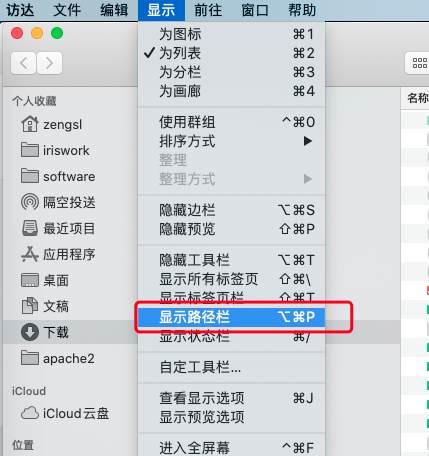
访达
显示路径栏
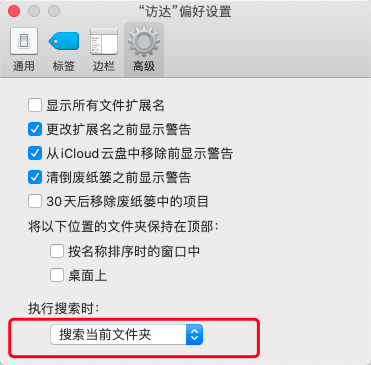
设置默认搜索范围为当前文件夹
设置打开访达的快捷键
通过“自动操作”功能,点击新建文稿-》快速操作(选取)-〉
实用工具、选择开启应用程序拖拽至右侧
选择“没有输入”
下方选择打开的应用程序,因为访达不在应用程序里面,所以要选择新建变量,在路径/System/Library/CoreServices/下选择访达
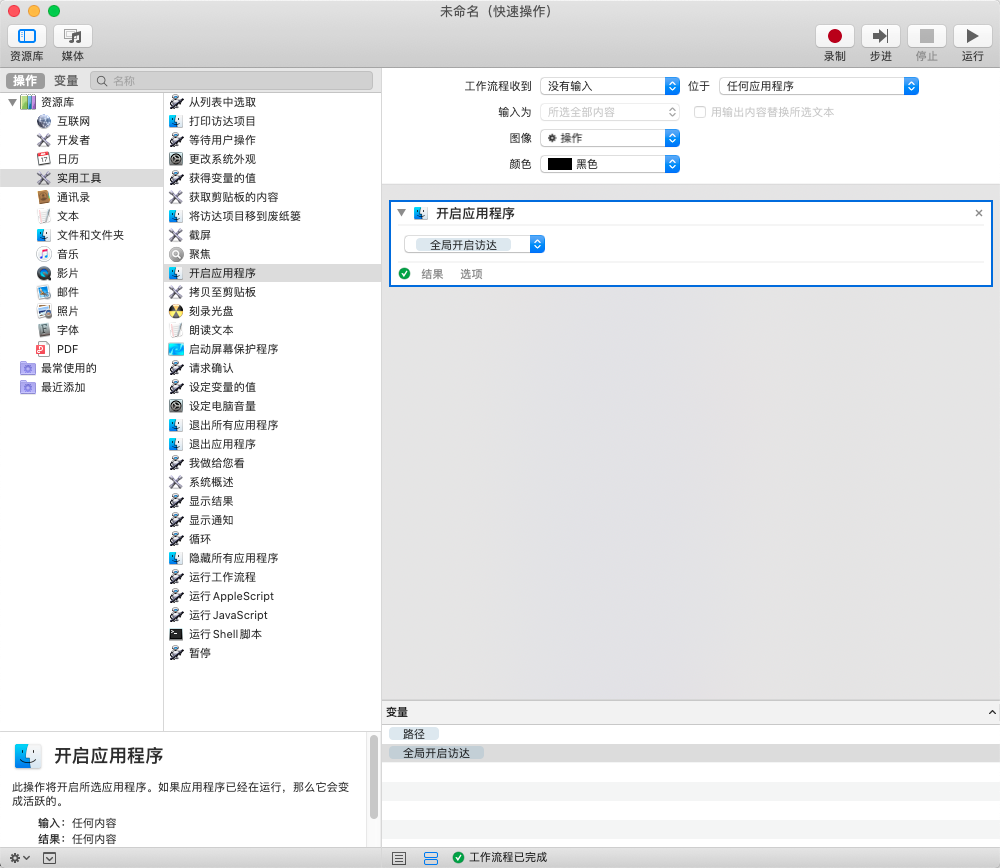
点击右上方运行进行测试
名称修改为“全局开启访达”,点击完成
快捷键command+s 进行存储,名称也叫“全局开启访达”
设置快捷键
进入键盘-》快捷键-〉点击服务-》找到“全局开启访达”进行设置-〉快捷键设置为option+command+空格
因为这个快捷键和默认的显示‘访达’搜索窗口冲突了,在键盘-》快捷键-〉聚焦中把显示‘访达’搜索窗口的快捷键取消
参考mac云课堂
网络
设置固定IP
软件验证
macOS无法验证此App不包含恶意软件
可选以下方式进行设置
- 需要进入“系统偏好设置”->"安全与隐私"->点击”仍要打开“
- 从根本上关闭,执行sudo spctl --master-disable
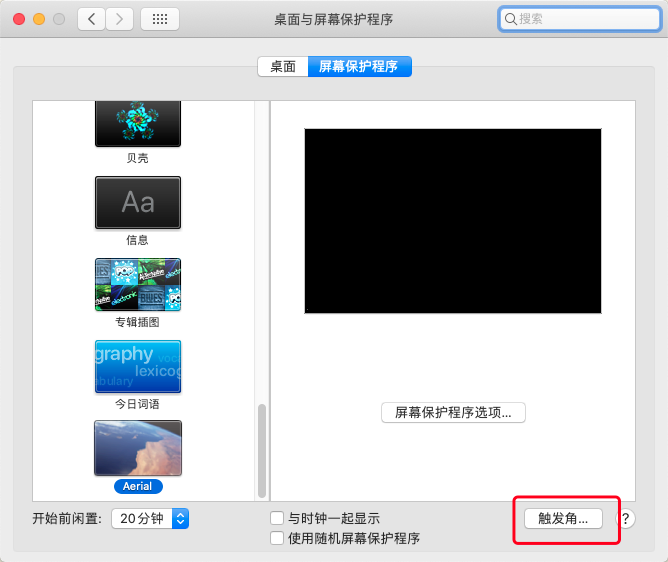
触发角
系统偏好设置->桌面与屏幕保护程序
iterm2
文件上传
- 方式一:使用rz、sz命令
解决在iterm2中sz、rz命令无效问题
#参考资料https://codechina.csdn.net/mirrors/aikuyun/iterm2-zmodem?utm_source=csdn_github_accelerator
#1.安装sz rz
brew install lrzsz
# 进入目录添加权限
cd /usr/local/bin
# iterm2-send-zmodem.sh iterm2-recv-zmodem.sh要先下载
chmod +x iterm2-send-zmodem.sh
chmod +x iterm2-recv-zmodem.sh
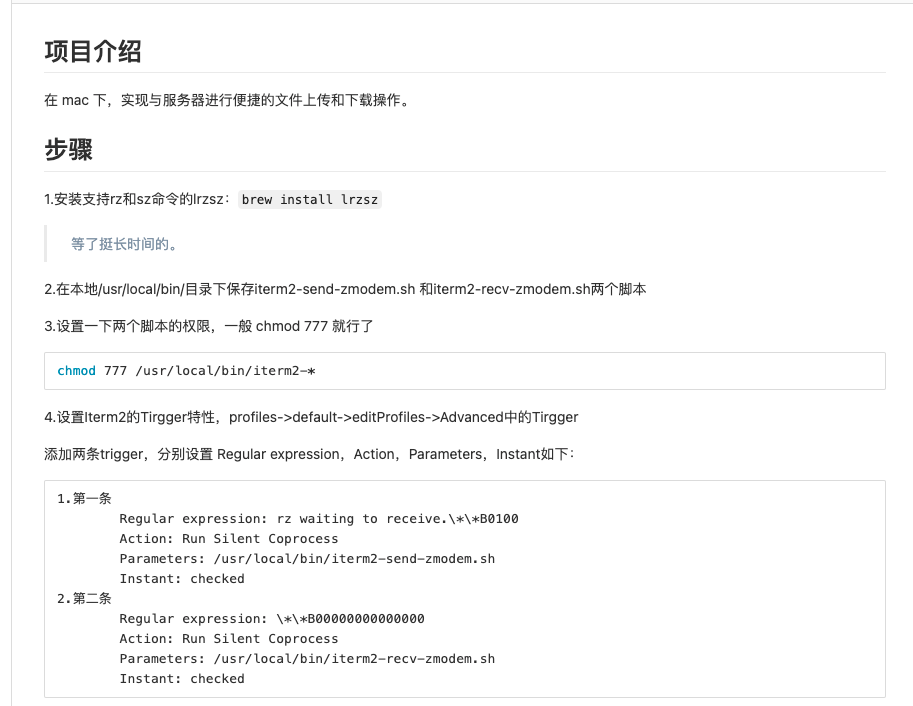
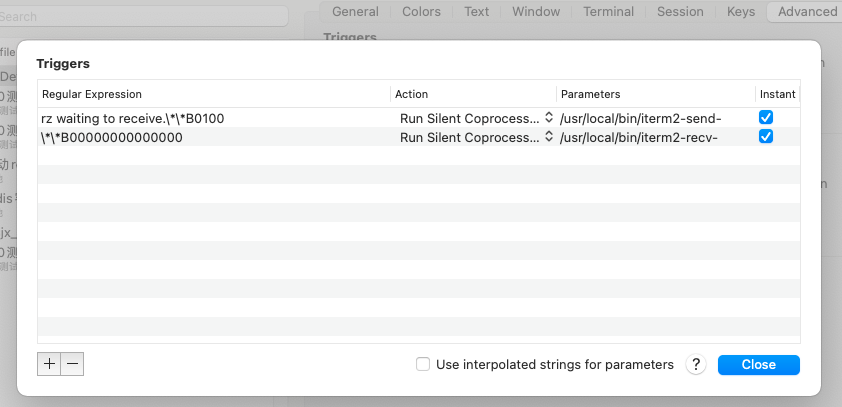
# 设置iterm2的触发器(triggers)
# 执行如下以下步骤:command+“,” 组合键打开item2的“Preferences”面板->Profiles选项卡->Advanced->Triggers(点击Edit即可
#
Regular expression: rz waiting to receive.\*\*B0100
Action: Run Silent Coprocess
Parameters: /usr/local/bin/iterm2-send-zmodem.sh
Regular expression: \*\*B00000000000000
Action: Run Silent Coprocess
Parameters: /usr/local/bin/iterm2-recv-zmodem.sh
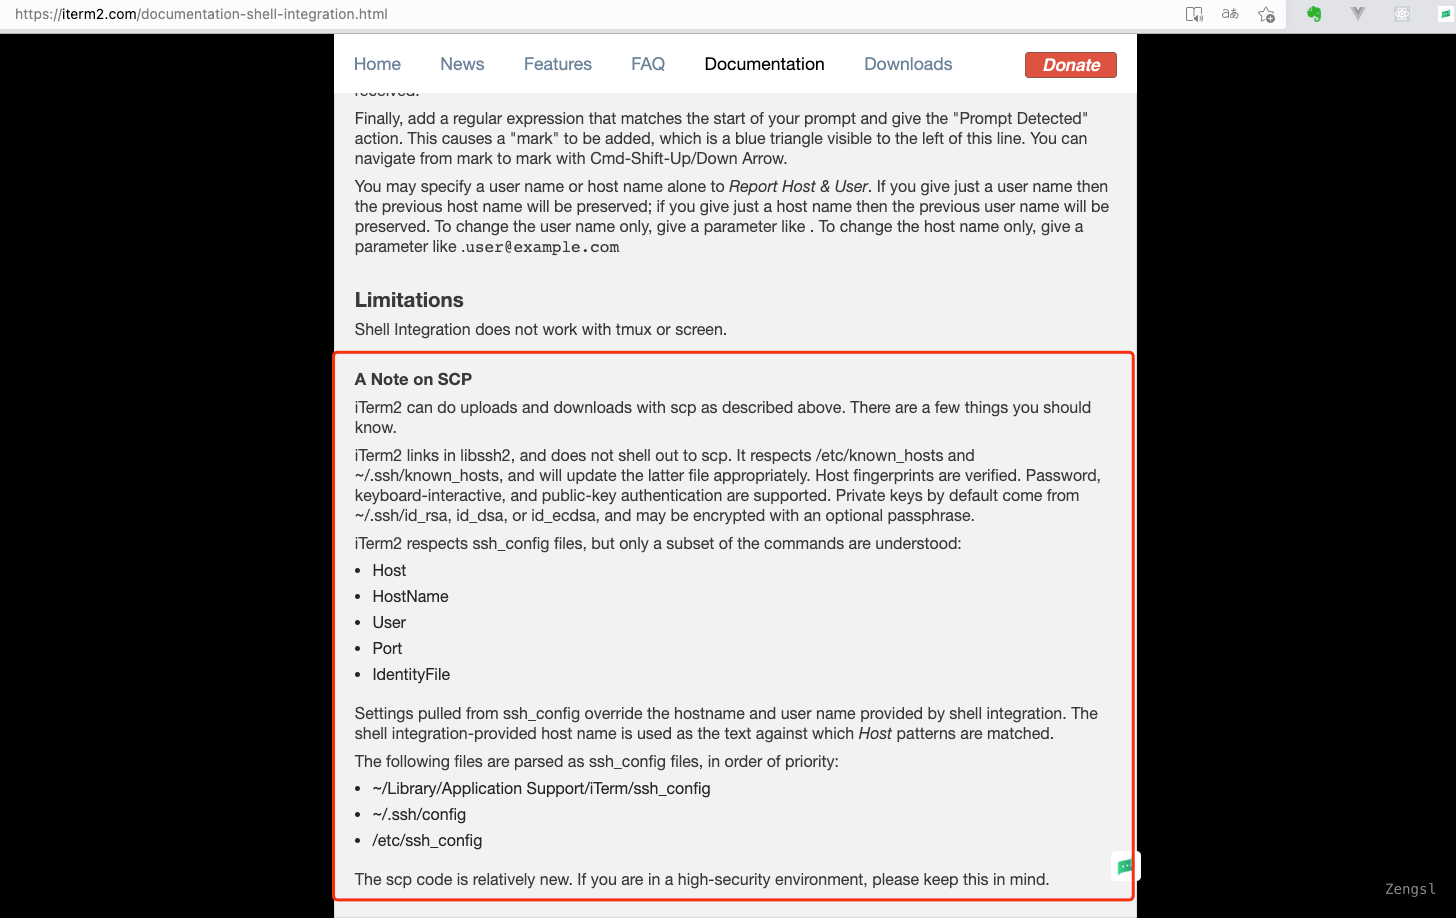
- 方式二:Shell Integration(好多限制,不推荐)
使用方式:
注意:
保存SSH密码
集成sshpass使得iterm2保存ssh密码
/usr/local/bin/sshpass -p 密码 ssh -p port username@ip
如果是默认端口则不需要指定 -p port
homebrew
从码云中安装
# 安装
/bin/zsh -c "$(curl -fsSL https://gitee.com/cunkai/HomebrewCN/raw/master/Homebrew.sh)"

# 安装应用历史版本
brew tap homebrew/cask-versions
git
brew install git
配置方式 安装文档
svn
安装客户端SnailSVN,可使用默认设置或进行相关路径配置
安装命令
brew install svn
oh my zsh
提示
需确保系统的默认shell为zsh,可以通过echo $SHELL$来进行查看
如果不是,可通过chsh -s $(which zsh)进行设置
这里选择的是检出仓库安装的方式
git clone https://gitee.com/zengsl/ohmyzsh.git ~/.oh-my-zsh
备份已有配置
cp ~/.zshrc ~/.zshrc.orig
使用oh-my-zsh提供的默认配置
cp ~/.oh-my-zsh/templates/zshrc.zsh-template ~/.zshrc
如果输入命令出现有关权限的警告,可以通过赋权来去除
chmod g-w,o-w /usr/local/share/zsh
chmod g-w,o-w /usr/local/share/zsh/site-functions
修改~/.zshrc设置主题
可以参考主题
我这里设置的是ZSH_THEME="agnoster"

如果iterm2中出现乱码则需要安装powerline字体,并且在iterm2中进行设置
vs code的终端如果出现乱码,也需要设置终端为powerline字体
安装方法
#clone
git clone https://github.com/powerline/fonts.git --depth=1

# install
cd fonts
./install.sh

# clean-up a bit
cd ..
rm -rf fonts
安装zsh-completions插件
brew install zsh zsh-completions
安装zsh-syntax-highlighting插件 参考文档
brew install zsh-syntax-highlighting

# To activate the syntax highlighting, add the following at the end of your .zshrc:
source /usr/local/share/zsh-syntax-highlighting/zsh-syntax-highlighting.zsh

#If you receive "highlighters directory not found" error message,
#you may need to add the following to your .zshenv:
export ZSH_HIGHLIGHT_HIGHLIGHTERS_DIR=/usr/local/share/zsh-syntax-highlighting/highlighters
因为已经安装了oh-my-zsh,则可以使用插件的方式进行安装,参考官方文档
Oh-my-zsh
Clone this repository in oh-my-zsh's plugins directory:

git clone https://github.com/zsh-users/zsh-syntax-highlighting.git ${ZSH_CUSTOM:-~/.oh-my-zsh/custom}/plugins/zsh-syntax-highlighting
Activate the plugin in ~/.zshrc:

plugins=( [plugins...] zsh-syntax-highlighting)
Restart zsh (such as by opening a new instance of your terminal emulator)或者source ~/.zshrc
安装zsh-autosuggestions 参考文档
brew install zsh-autosuggestions

#To activate the autosuggestions, add the following at the end of your .zshrc:
source /usr/local/share/zsh-autosuggestions/zsh-autosuggestions.zsh

# will also need to force reload of your .zshrc:
source ~/.zshrc
安装Powerlevel10k主题
如果出现以下错误就升级zsh

如果是centos是用yum升级,只能升级到5.0.2。需要手动升级
实在不行,安装不了10就安装9
tldr
autojump
brew install autojump

#把`eval $(thefuck --alias) `加到~/.zshrc中,然后执行` source ~/.zshrc`或者重新打开你的shell
the fuck
brew install thefuck

#把`eval $(thefuck --alias) `加到~/.zshrc中,然后执行` source ~/.zshrc`或者重新打开你的shell
日志文件阅读器lnav
下载之后可以将lnav移动至/usr/local/bin中
JDK
JDK6是苹果提供的,6以上才有oracle版本的,有两种安装方式。
苹果官网安装https://support.apple.com/kb/DL1572?locale=zh_CN
采用brew cask安装
brew cask install java6安装目录在/Library/Java/JavaVirtualMachines/1.6.0.jdk
通过brew search java可以搜索到所有java的版本,同理可以安装其他版本JDK
jenv
brew install jenv
将以下内容加入~/.zshrc
export PATH="$HOME/.jenv/bin:$PATH"

eval "$(jenv init -)"
使用jenv add 将JDK加入jenv中
如:jenv add /Library/Java/JavaVirtualMachines/1.6.0.jdk/Contents/Home
其他命令
# 查看当前版本
jenv versions

# 设置当前JDK
Jenv local 1.8
安装node
brew install node或者官网
将npm的源改为阿里源
npm config set registry https://registry.npm.taobao.org
安装cnpm https://developer.aliyun.com/mirror/NPM?from=tnpm(失败)
npm install -g cnpm --registry=https://registry.npm.taobao.org
环境变量
https://www.iteye.com/blog/elf8848-1582137
设置~/.bash_profile
在~/.zshrc文件最后,增加一行: source ~/.bash_profile
在根路径下创建文件夹
早期版本
重启电脑,按住 cmd+R进入恢复模式 关闭SIP: csrutil disable,然后重启
重新挂载根目录: sudo mount -uw /
创建iriswork和Project,
sudo mkdir /irisworksudo mkdir /Project接下来划重点:现在已经可以在根目录创建文件夹,但是,你在根目录创建之后,一旦重启电脑,你创建的目录又是只读权限了。所以,正确的做法是把你需要的目录软链接到根目录, 例如:
sudo ln -s /Users/zengsl/iriswork /sudo ln -s /Users/zengsl/Project /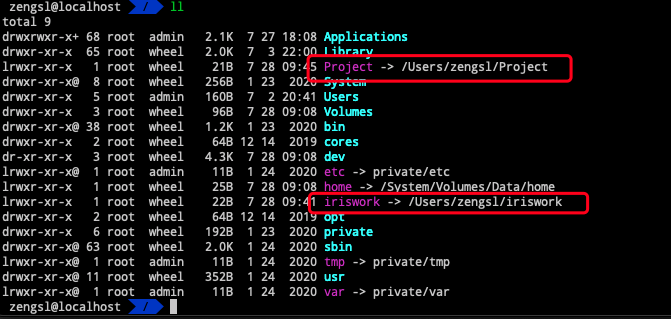
image-20200728095826176 重新进入恢复模式,重新打开SIP: csrutil enable
Big sur后的版本
big sur请参考下面的方法:
通过/etc/synthetic.conf添加,用tab分割 Project /Users/zengsl/Project iriswork /Users/zengsl/iriswork
配置此文件即可,无需重启和关闭SIP。M1版本已验证,intel版本如不生效则尝试重启和关闭SIP。
IDEA
服务器启动参数
-Dspring.profiles.active=macdev
-Degrant.resource.menuflag=01
-Dwtp.validateCode=enable
-Dwtp.validateCodeCount=5
-Dfile.encoding=UTF-8
-Xms1024m
-Xmx1024m
-XX:PermSize=128M
-XX:MaxPermSize=256M
根据需要设置touch bar

https://www.jetbrains.com/help/idea/touch-bar-support.html
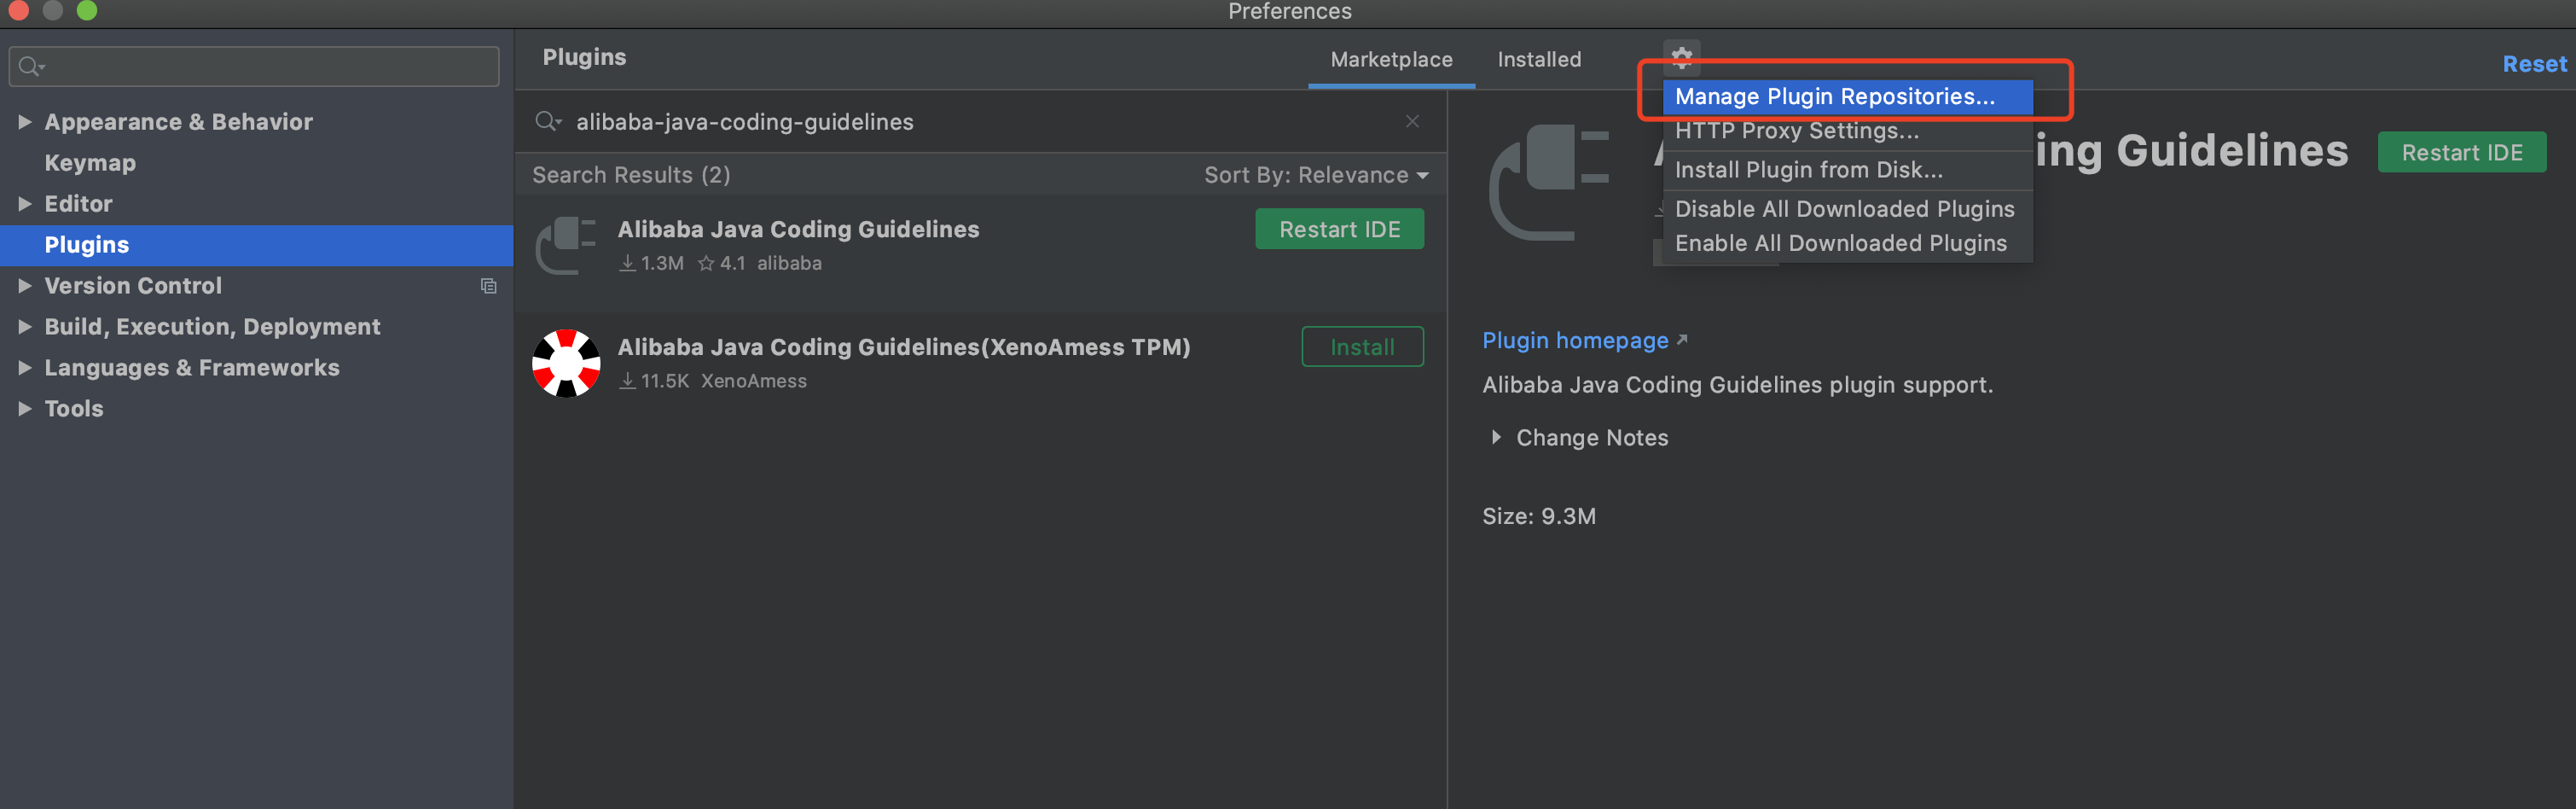
如果你无法在idea中搜索plugin,可以尝试设置下仓库https://plugins.jetbrains.com/idea
配置svn
如果出现svn操作窗口显示的有问题或者文件没有关联上svn,检查一下这个文件里面的路径是不是有问题,修改好之后重启下IDEA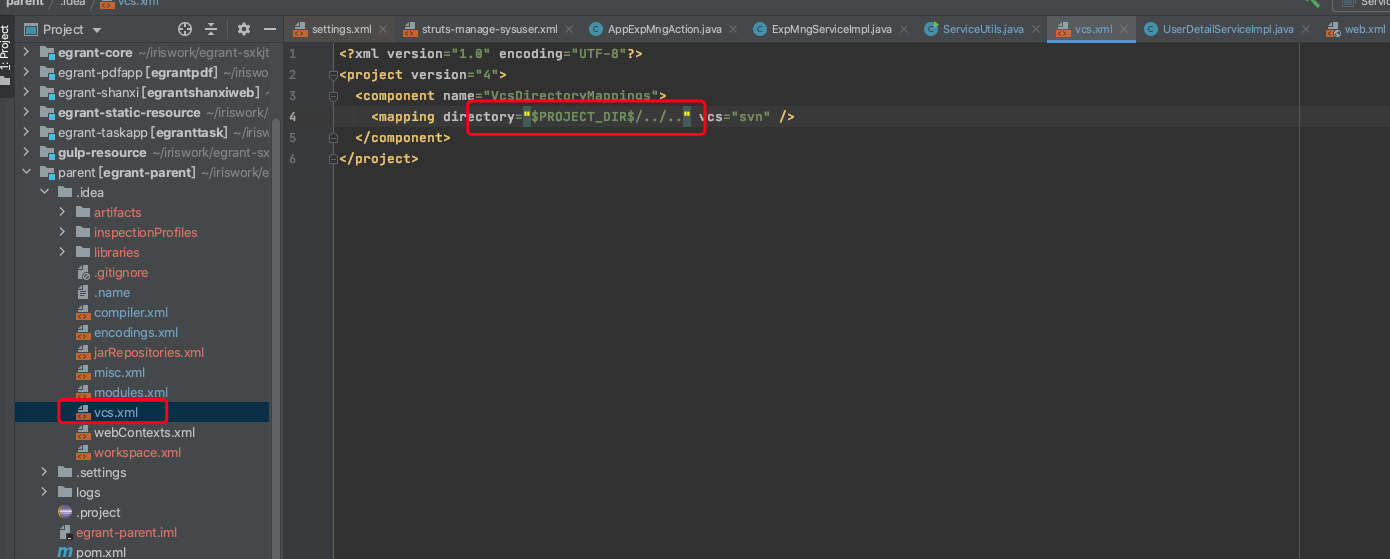
redis
brew install redis
redis-server /usr/local/etc/redis.conf
其他软件
反编译工具brew install --cask jd-gui 问题解决
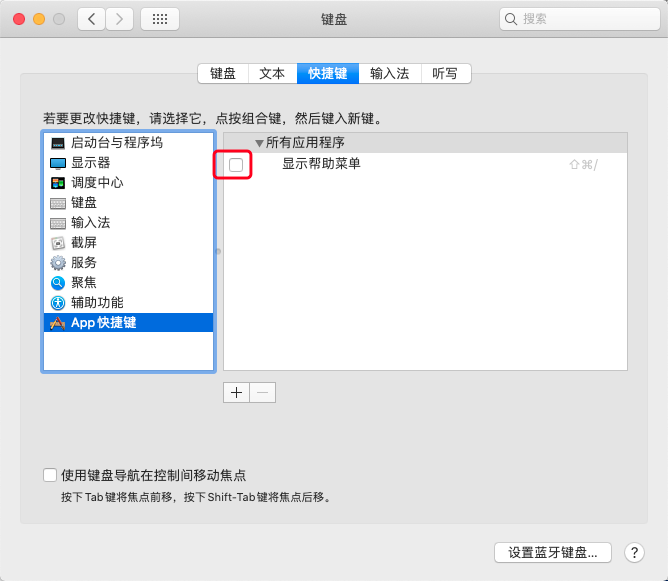
快捷键设置
Idea注释快捷键与mac自带快捷键冲突,去除mac冲突的键
splashtop Personal